Broadcast Menu- Learn how to broadcast bulk WhatsApp messages.
EasySocial offers the convenient feature of bulk broadcasting, allowing you to send multiple messages simultaneously. The speed at which messages are throttled depends on the plan you choose. With the basic plan, you can send up to 40 messages per second, while the business plan allows for 80 messages per second. For those who opt for the enterprise plan, the speed increases to 200 messages per second.
Suppose you need to send a substantial amount of 100,000 messages. In such a scenario, EasySocial's efficient system will ensure that your messages are delivered in a timely manner. It would take approximately 17 minutes for all the messages to be successfully transmitted.
EasySocial offers three distinct methods for conducting bulk broadcasts. Let us learn how to use these methods.
Bulk broadcast via Custom API
Log in to Your EasySocial Account
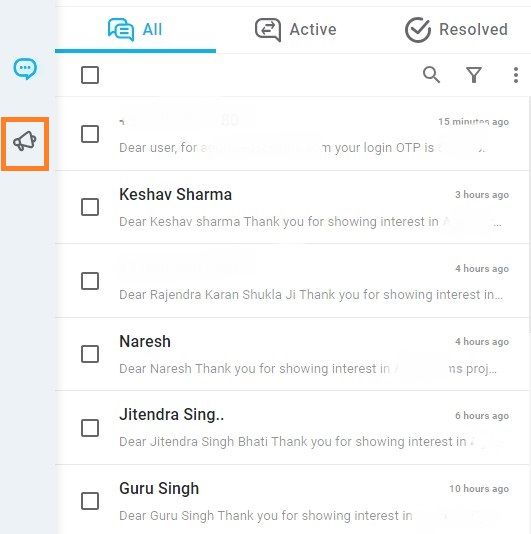
First things first, log in to your EasySocial account.Navigate to the "Broadcast" Menu
On the left-hand side of the workspace, click on the "Broadcast" menu. This is where all the magic happens!
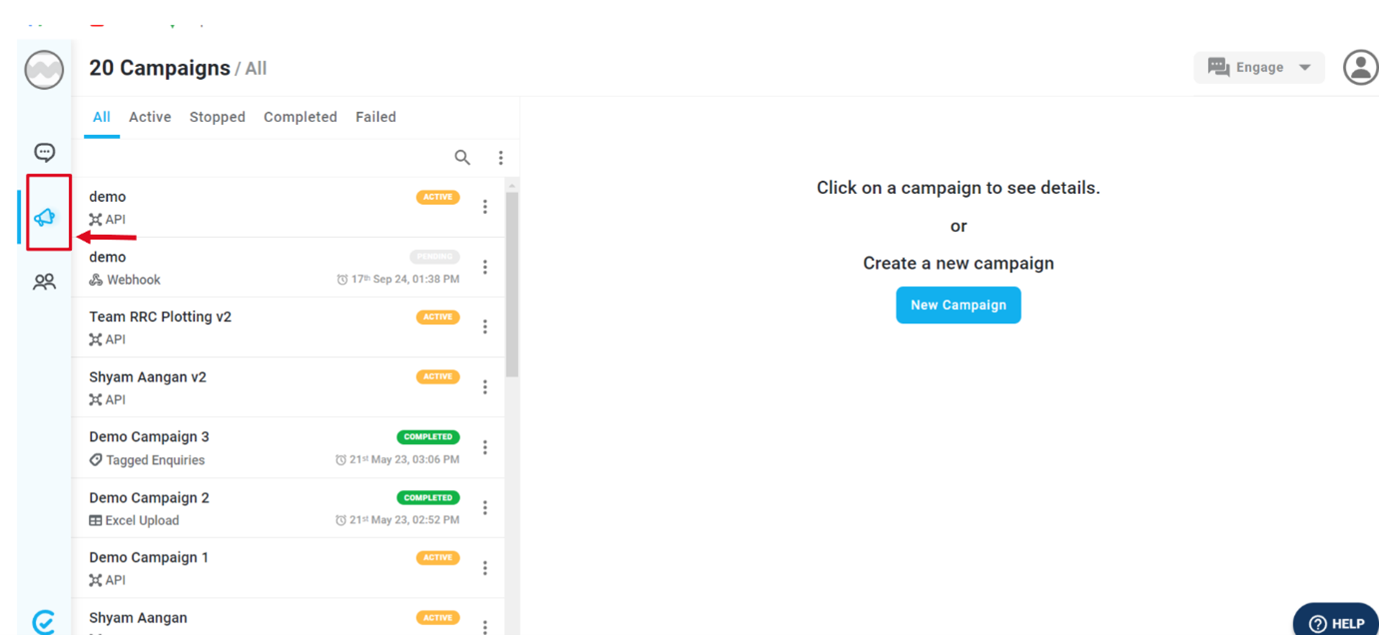
- View Past Campaigns
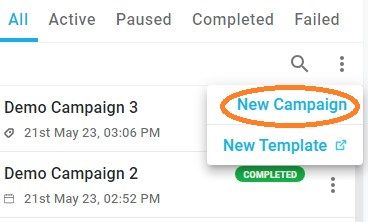
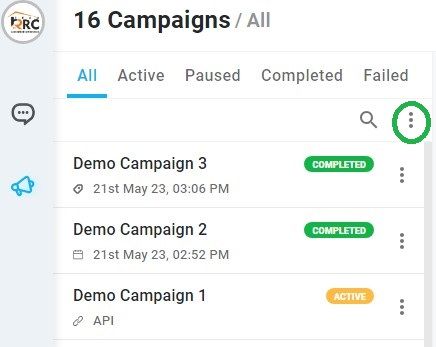
Once you’re in the Broadcast menu, you’ll see a list of all the campaigns you’ve run in the past on the left side. - Create a New Campaign
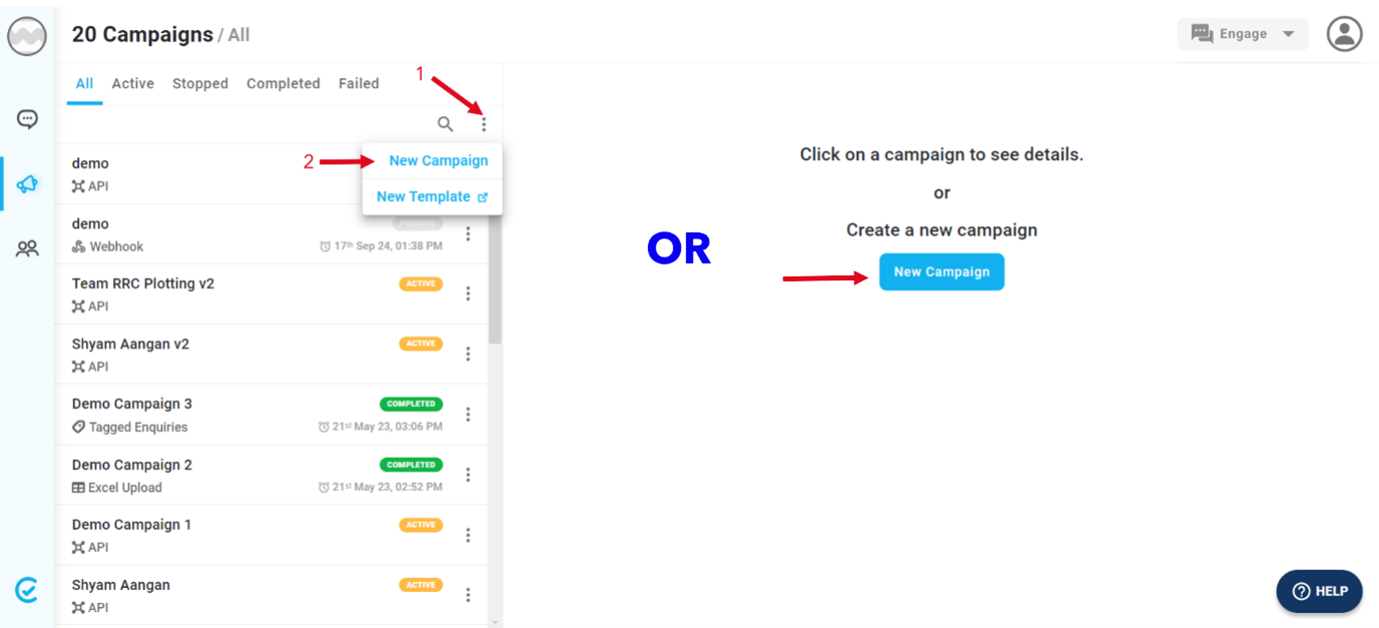
Ready to create a new campaign? You can do this in two ways:
Either click on the 3-dot menu (1) next to the search bar and select "New Campaign" (2).
Or just click the "New Campaign" button on the right side of the screen.
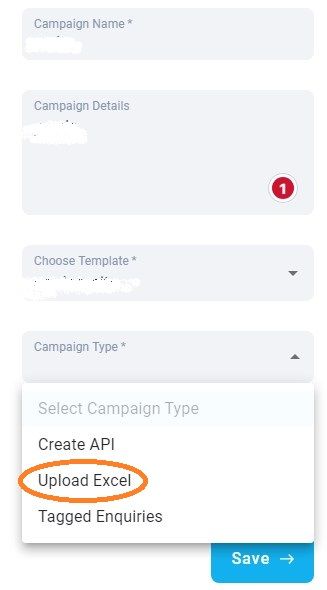
Create Campaign Drawer
After you click on "Create Campaign", a drawer window will slide open from the right side of your screen.
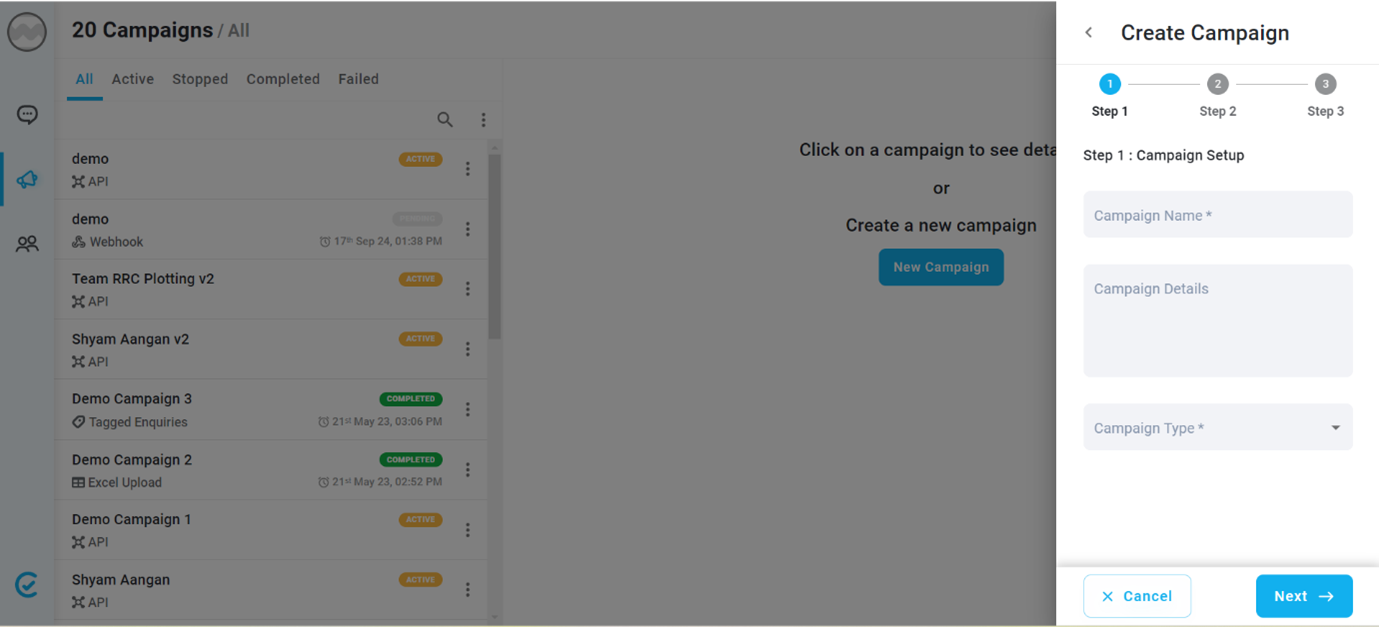
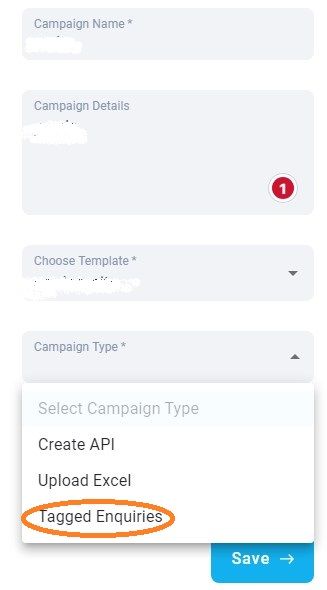
Step 1: Set Up the Campaign
- Name your Campaign: Type in the name of your campaign.
- Campaign Details (Optional): You can add a short description of the campaign. This info won’t be visible to your customers—it’s just for your reference.
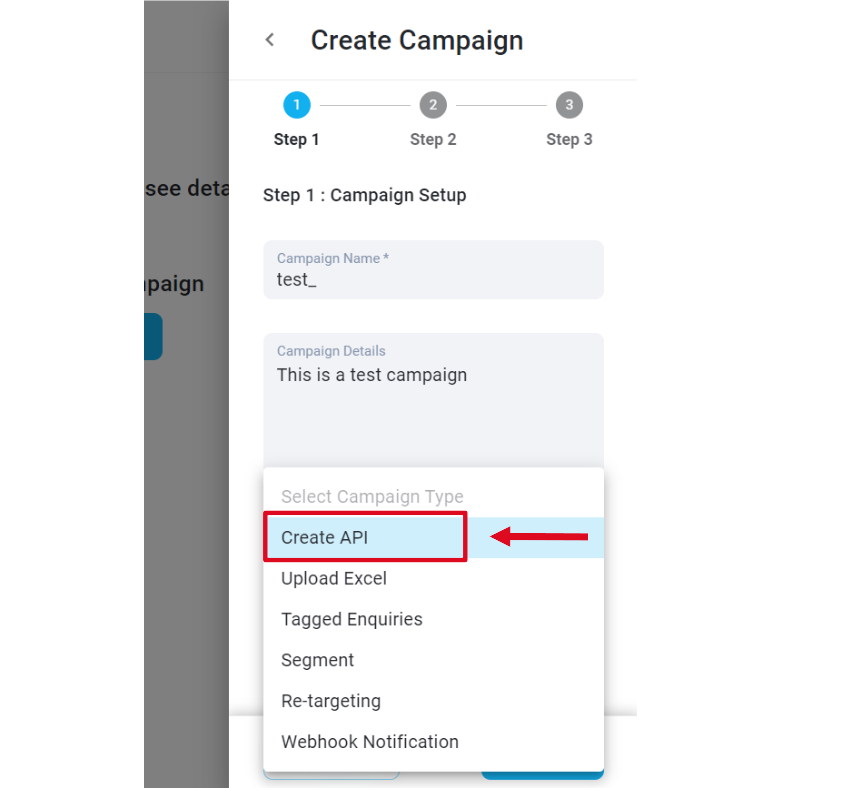
- Select Campaign Type: Choose "Create API" as your campaign type.
- Move on to Step 2.
Step 2: Create or Choose a Template
- You have two options here:
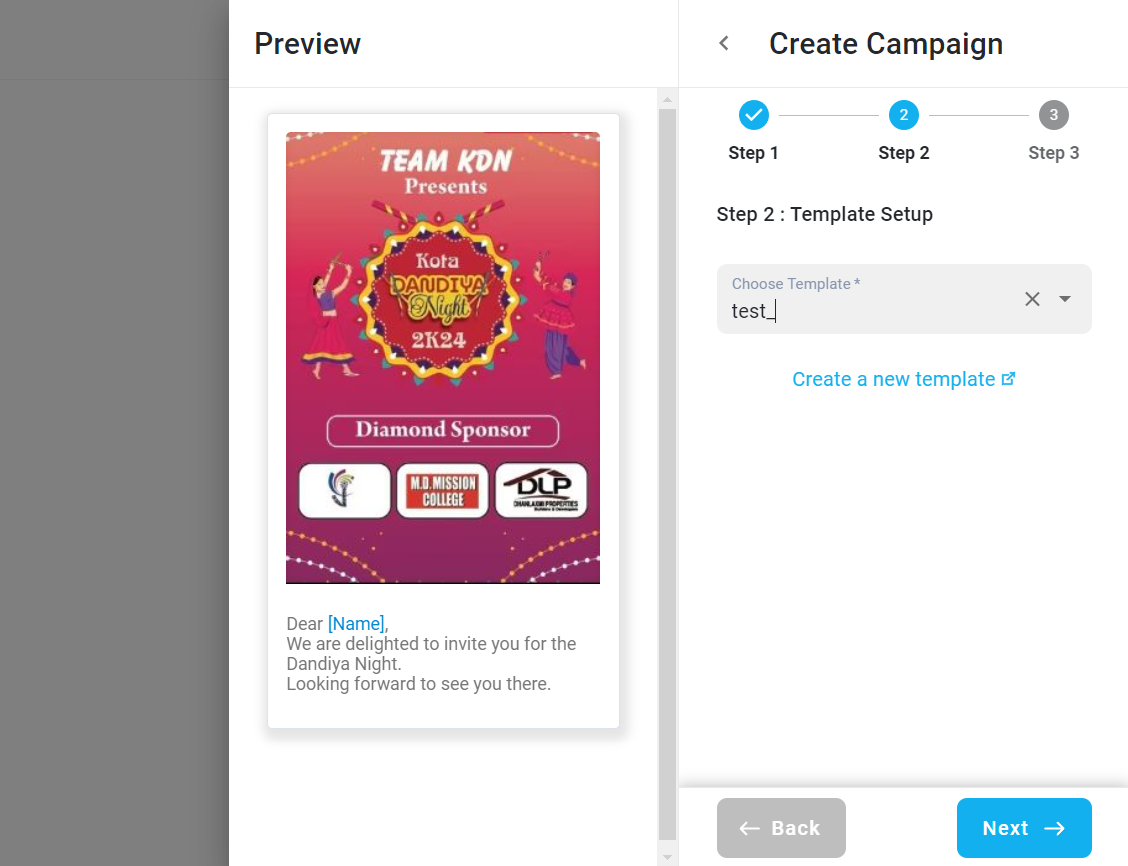
- Select a pre-approved template from the drop-down list (1).
- Create a new template (2)(you’ll be redirected to a page with pre-approved templates, and you can create your own from there).
- Select a pre-approved template from the drop-down list (1).
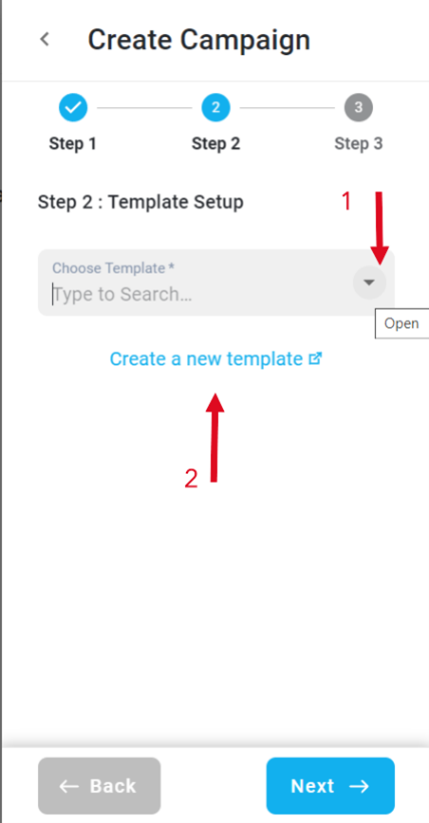
- If you select a pre-approved template, you’ll get a preview of what it looks like.
- If we select the option “Create a new template” then we would be redirected to the page which will have pre- approved templates where we would have an option to create our new templates.
Need more help with creating templates? No worries, you can find a guide through the provided link!
https://easysocial.io/docs/expert-guide-to-create-whats-app-template-message-on-easy-social
- You can enable the "Add Tag to Lead" option, which lets you tag inquiries with pre-existing tags.
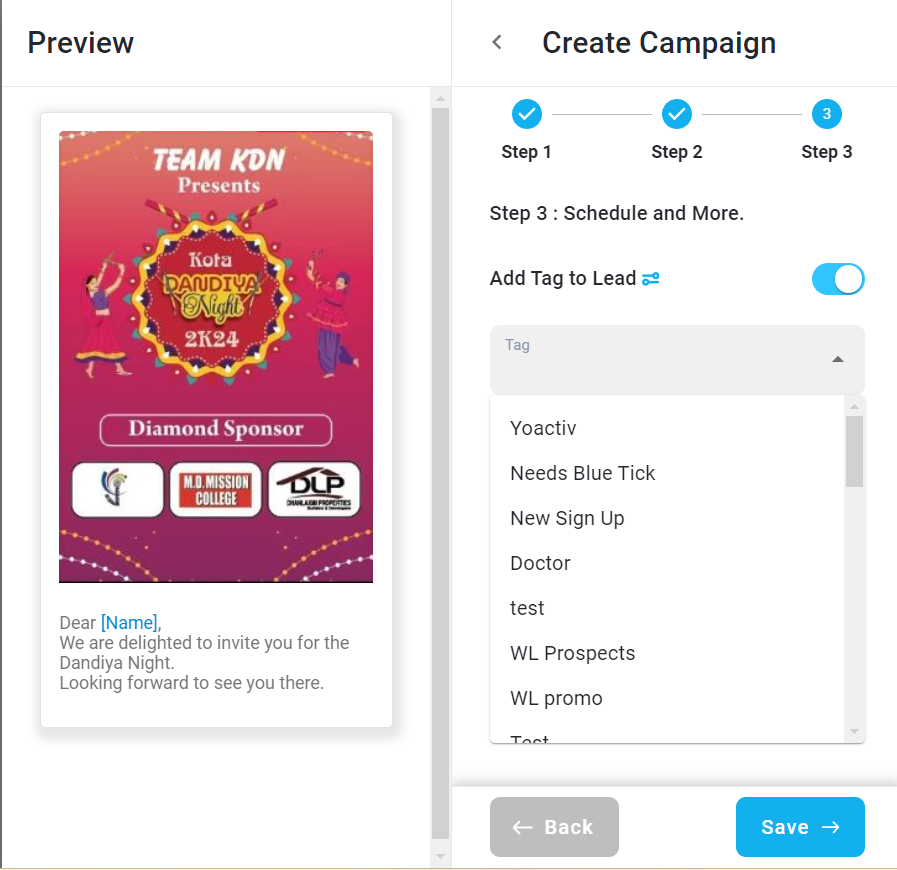
- This is super helpful for organizing and filtering later on.
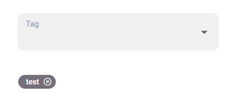
For example, if you select the tag "test", it will be automatically applied to relevant inquiries.
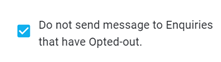
Next, check the "Do not send message to Enquiries that have Opted-out" box to avoid sending messages to customers who have opted out.
Save the Campaign
- Click "Save" to save your campaign.
- Since you chose the "Create API" option, the campaign will be run via an API.
- You’ll be redirected to a page where you can choose the option "API".
Get the API Code
After selecting "API", you’ll see two versions of the API code:
SIMPLE code
CURL code

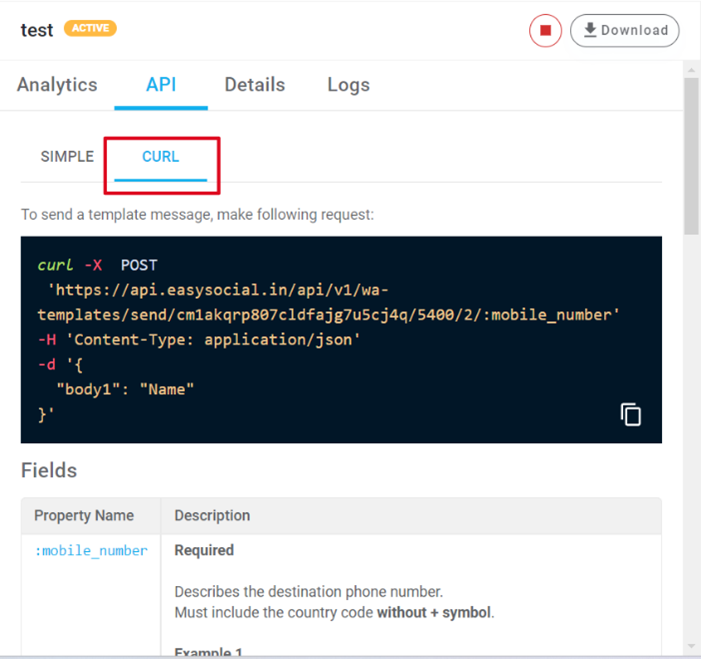
Just copy the code provided and add it to your website (or ask your developer to handle it). This code will integrate seamlessly with your website. For example, when a user fills out a callback form on your site, the API will capture their details and automatically send them a WhatsApp message.
You can also integrate this API with your app, CRM, or third-party systems for extra functionality!
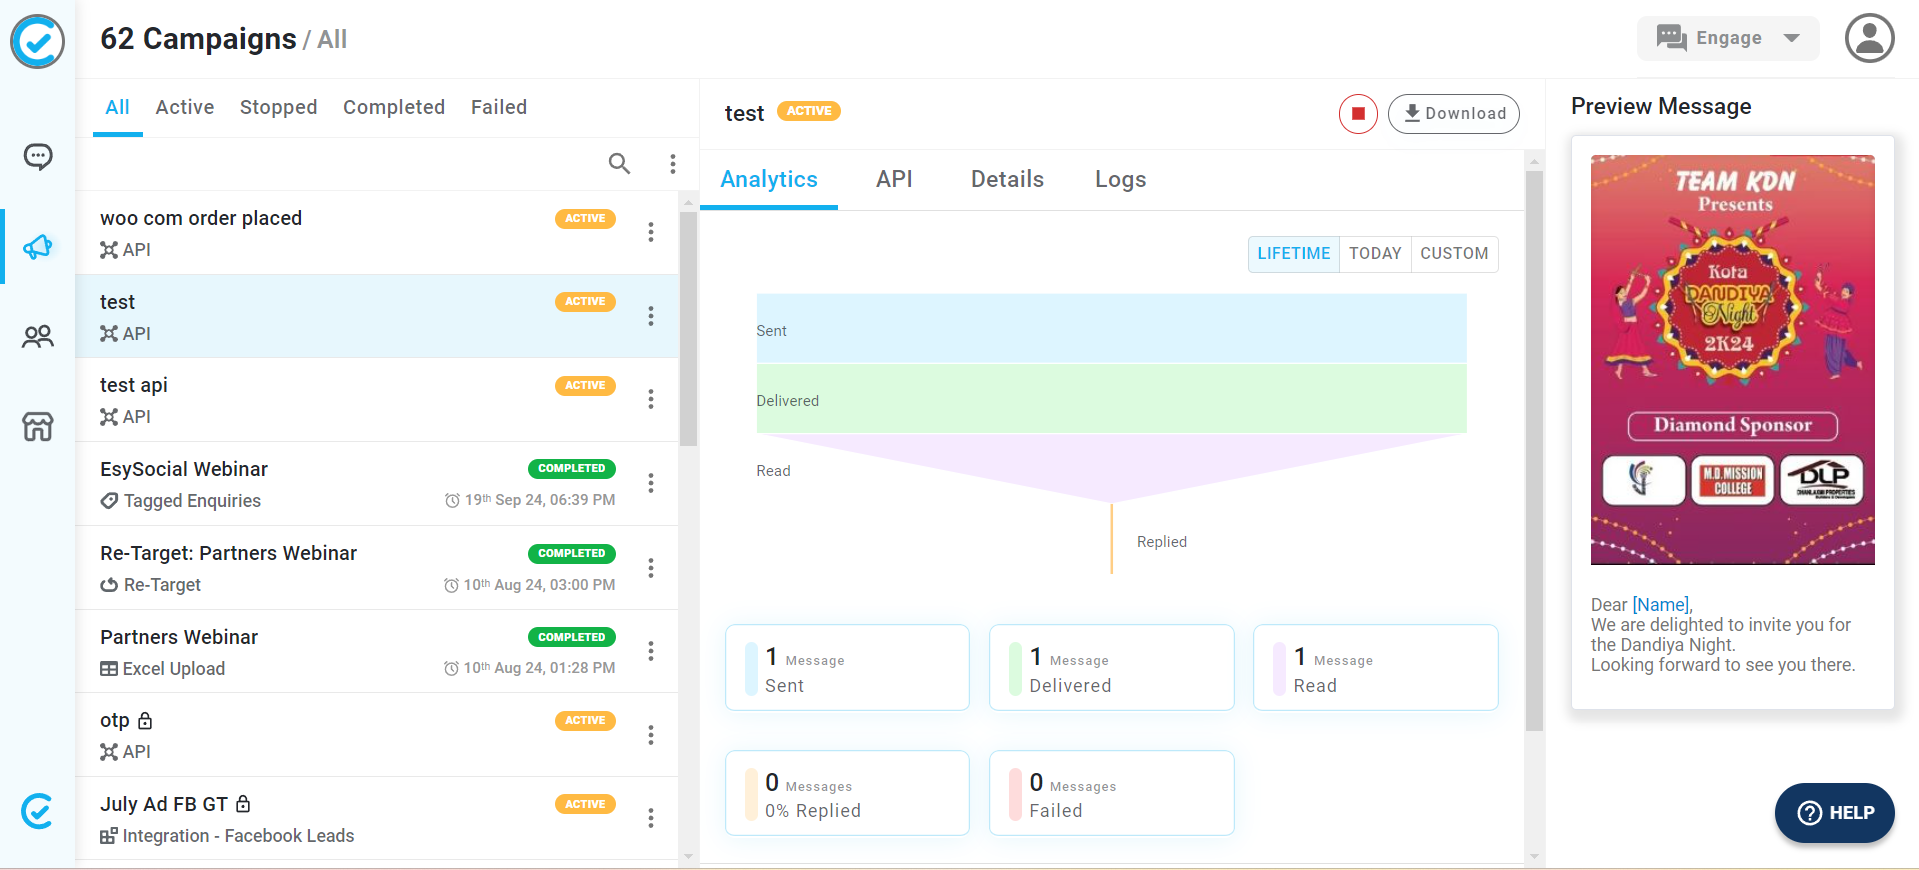
Monitor Your Campaign
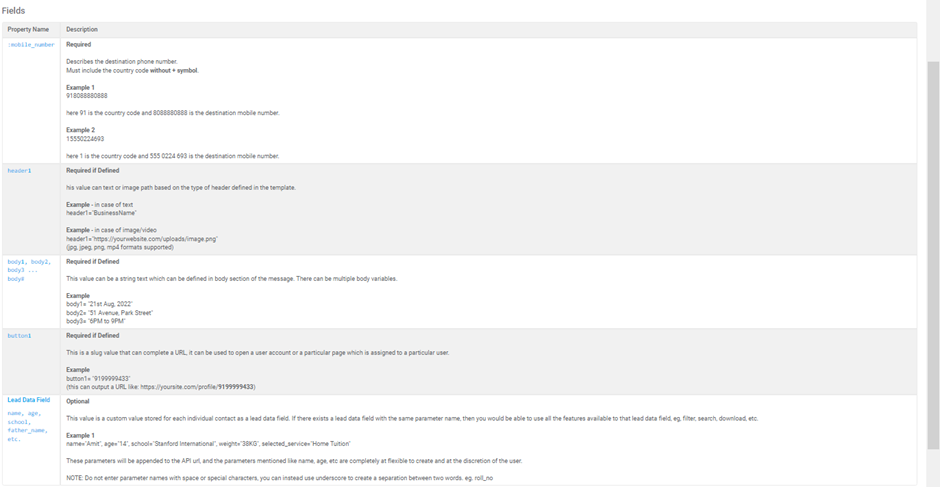
Scroll down to view additional fields for more information.
Want to see how your campaign is doing? Head to the "Analytics" tab at the top of the screen to check how many messages were delivered, read, replied to, and more.
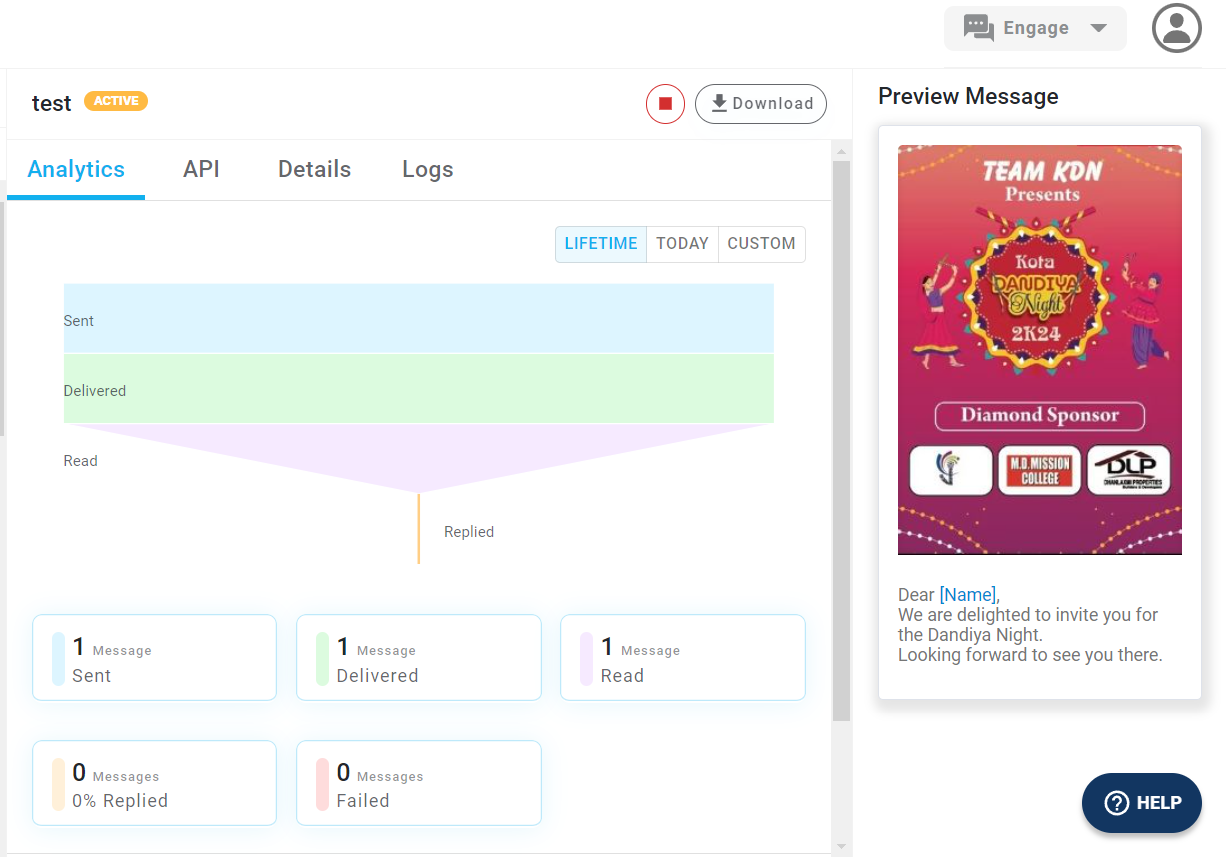
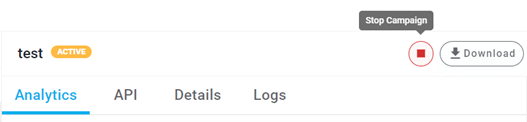
If you decide you don’t want to run the campaign anymore, you can stop it by clicking "Stop Campaign".
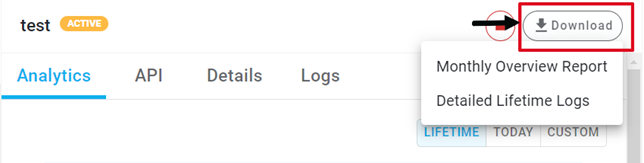
You can also download a report and logs by clicking "Download".
Bulk Broadcast via Excel Sheet
- Log in to your EasySocial account
- Click on the "Broadcast" menu from the left hand side of the Chat Interface.
- Once you are in the Broadcast section, you will be able to see all the campaigns on the left hand side which you might have run in the past.
- To create a new campaign click on the "New Campaign" button on the right hand side of the screen or click on the 3 dot menu beside the search option and click on "New Campaign"
- A prerequisite element to create a campaign is a "Template message" which should already have approval from WhatsApp
- You can thus click on "New Template" button and it will take you to the Templates section which is present in the Settings Options
- We have another document which explains how to create a Template message. You can refer to it for help.
- Once you click on "Create Campaign" a pop up window will open up on the right hand side of your screen
- Type in the name of the Campaign
- Then type in a short campaign detail. These two things will not be visible to your customers who will receive the message.

- Click on "Choose Template" and select the approved template which you want to broadcast.
- Then choose a Campaign type by clicking on "Choose Campaign Type"
Click on Download Sample Format
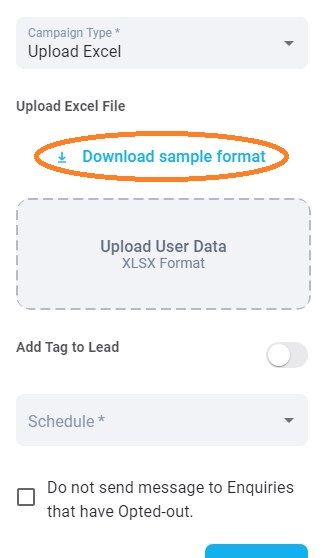
Add the country code of the phone numbers and the phone numbers to which you want to send the messages.
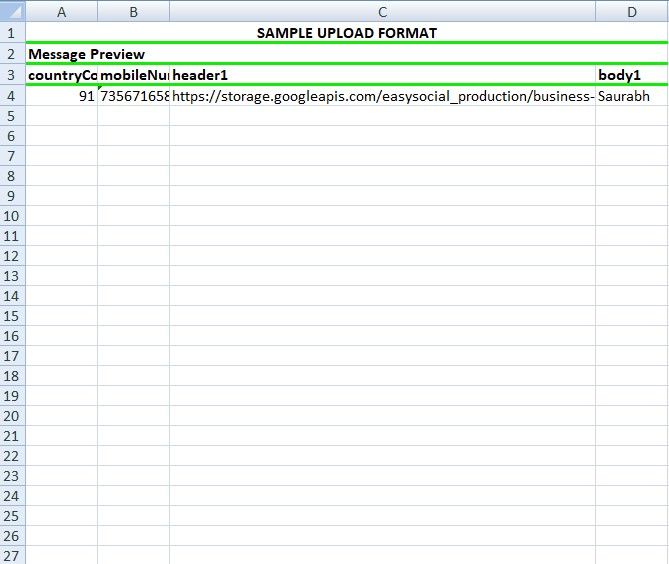
- If you upload a photo,video, text or document on the top of your template message, then on the excel sheet this data will be visible as a hyperlink. You need to drag this link up till the number of people you want to send messages. to. Please ensure that all of the characters in the link are same for all people.
- Add a body variable if you have added variable in the template message.
- Save this and download this file in an XLSXS format and drag it to Upload User Data field to upload it.
- You can add a tag
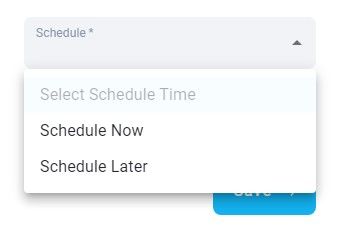
- Below this you will get an option to schedule messages. You can either send messages nor or later.
- You can also checkbox the "Do not send messages to those who opted out" or leave it as it is
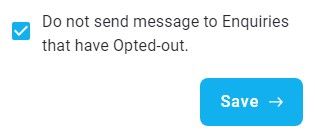
- Click on Save
- If you select "Schedule Now" the system takes at least 1.5 minutes to send messages
- You can also check the live statistics of the campaign
Bulk Broadcast via Tagged Inquiries
- Log in to your EasySocial account
Click on the "Broadcast" menu from the left hand side of the Chat Interface.
- Once you are in the Broadcast section, you will be able to see all the campaigns on the left hand side which you might have run in the past.
- To create a new campaign click on the "New Campaign" button on the right hand side of the screen or click on the 3 dot menu beside the search option and click on "New Campaign"
- A prerequisite element to create a campaign is a "Template message" which should already have approval from WhatsApp
- You can thus click on "New Template" button and it will take you to the Templates section which is present in the Settings Options
- We have another document which explains how to create a Template message. You can refer to it for help.
- Once you click on "Create Campaign" a pop up window will open up on the right hand side of your screen
- Type in the name of the Campaign
- Then type in a short campaign detail. These two things will not be visible to your customers who will receive the message.
- Click on "Choose Template" and select the approved template which you want to broadcast.
- In order to TAG INQUIRIES, first go to chat interface
- Click on any chat. Go to the right side of the page, you will be able to see "Tags"
- Click on the blue icon beside it and then select "New Tag" and then click Save
- Go to broadcast menu and select "New Campaign"
- Write the Campaign name and Campaign Details
- Choose "Tagged Inquiries" from Campaign type. This means that you only want to send messages to people whom you have already tagged.
- Scroll down and you will see an option of "Define Template Variables" if your template message contains a variable
- In Body1 you will be able to enable "Use Value from Lead Data Field"
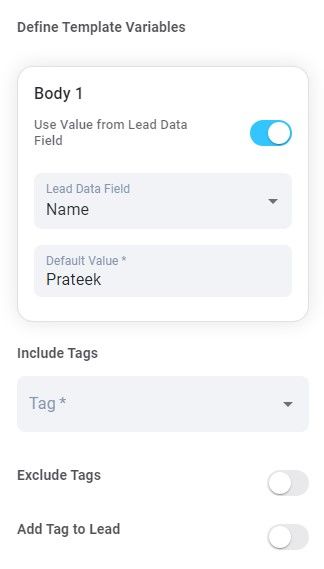
- Choose the desired lead data field in the dropdown below
- The system will automatically pick up the data from the chat of the lead and paste it on the template message. In case the data is not available, you can add a default variable to this field
- Scroll down and choose the tag from "Include Tags". This will send the message to the inquiries you have tagged means the customers on whom you have added tags. You can choose multiple tags, if you do so then multiple inquiries with different tags will get the message.
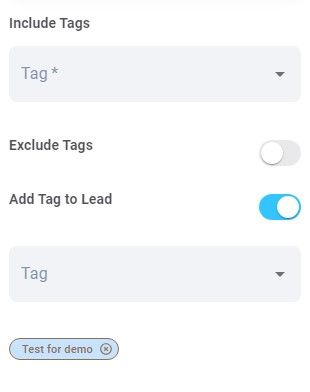
- You can also exclude tags by enabling the "Exclude Tags" button. From the dropdown you can choose the tags. So people under those tags will not get the message.
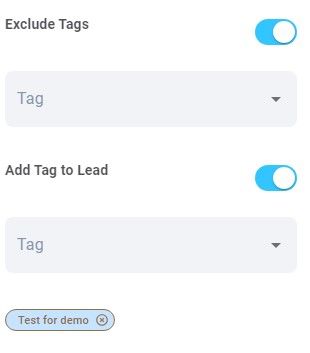
- You can also "Add a Tag" to the leads by enabling this option. It is an optional thing which you can do.

- Schedule it now or later and click save