How to Use the Opt-In Selector Node in Chatflow
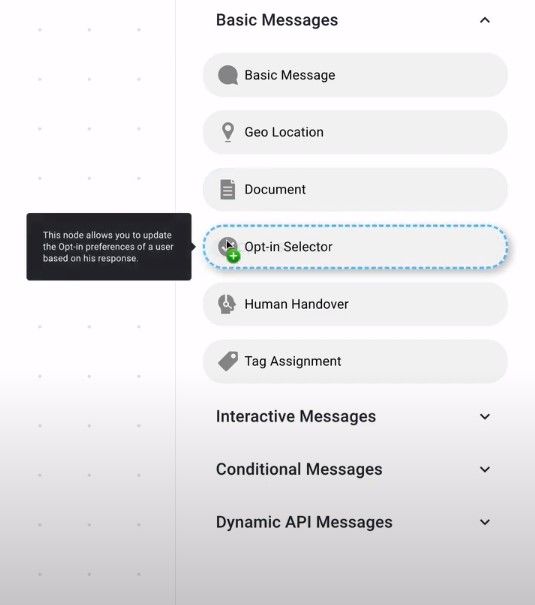
This node allows you to update the Opt-In preferences of a user based on his/her response. The user can choose if they want to hear from you or not.
Once you are within the Chatflow interface you will be able to see the "Opt-In Selector Node" under the Basic Message category on the right hand side of the page.
How and Where to use?
- Click on the Opt-In Selector Node from the Node's Drawer on the right side of the screen
- Drag the node in the Chatflow canvas
- Now click on the node in the canvas it will select the node and also open a properties drawer on the right side of the screen. This drawer will allow you to change the settings and properties of the selected node.
- On the property drawer the first property is "Node Title". This allows you to rename the text written on the node. This helps you to identify the purpose of the node in the chatflow. The text written on the node title does not get printed in the conversation.
- For this example we can keep the node title unchanged.
- Before adding this node to the chatflow, you need to give some options to the user. In order to do it you can use the "Interactive Button Response" node. You can add two options "Interested" and "Not Interested".
- You need to connect one Opt-In selector to one option then you need to click and drag another Opt-In selector node to connect it to the other option
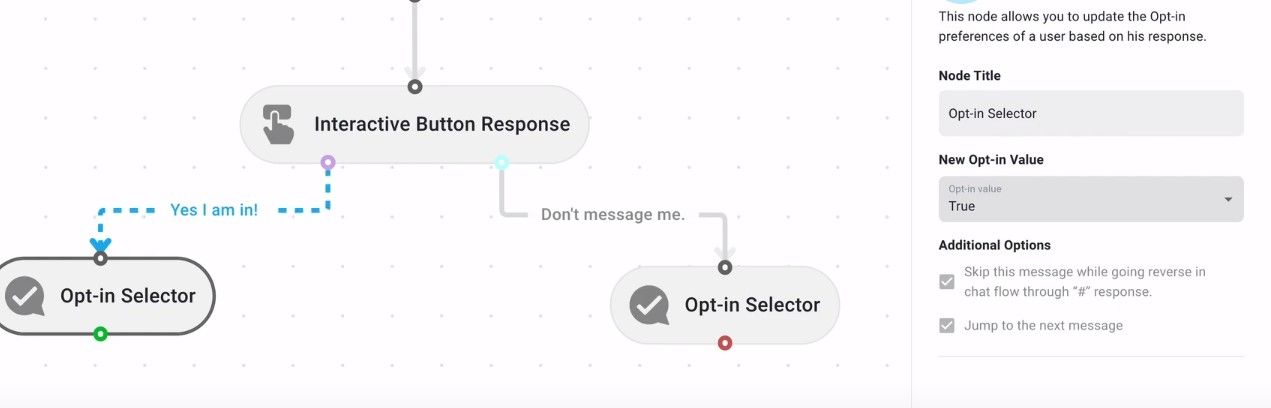
- Click on the node which is connected to "Interested" option.
- Set the "New Opt-In Value" as True from the node drawer on the right side.
- Click on the node which is connected to the "Not Interested" option
- Set the "New Opt-In Value" as False from the node drawer on the right side.
- You can connect two basic message nodes with the two Opt in selector nodes respectively.
- You can write the messages on both the basic message nodes according to the "Interested" and "Not Interested" choices.
Below this you will be able to see "Additional Options"
Additional Options
Mark Node as Start Node
When you select this option, the chatbot will consider this node as the starting message of the conversation.
Mark as end node
If you checkbox this, the chatbot will consider this node as the end message of the conversation
Assign enquiry at this step based on a pdelete-brand-guide-api rule
On choosing this option, automatically your inquiries will be assigned to your team members based on some pdelete-brand-guide-api rules. You can distribute the leads from "Lead Management" option in Settings and select "Lead Distribution Rules"
Skip this message while going reverse in chat flow through “#” response.
If a customer wants to go reverse in a chatflow instead of going forward he can do so by replying with a "#". This feature gets enabled on checkboxing this option.
Stop Auto-Reminder after this message
There are certain settings in our chatflow which allows you to send automated reminders to your customers. You can enable this from the Settings option located at the bottom of the Chatflow interface. If you do not want the auto reminders to be sent for a particular message then you can select this option.
Re-send message on invalid response from user
If the customer sends a message apart from the expected message then using this option you can send the same message again so that the customer can understand which type of response you want from him.
Jump to the next message
When you checkbox this option, the chatbot does not wait for the user to respond. It directly jumps to the next message